GO BUY IT! Like ten copies! NOW!
IGN Review: 90!

 Our back wheels are bare and need a home. Luke begins marking his foam core to make a skeleton for the fender molds.
 The fender has too look good, so he smooths out the curves on fender ribs.
 Luke makes small cuts for the ribs to slide into.
 And now it starts to make sense as a mold. Or to look like the beginnings of a kick-ass fan.
 We've split up for the moment and are each focusing on different parts of the build. For example, Sean is about the cut out the old brake, which was damaged when we tested it at 30mph. The support was too thin and bent under all the power. It seems Sean thinks the best way to beef it up is to look like an over-protected nerd. HAHA! nice face-guard, loser! What could you possibly need that much protection for?
 Oh.. yeah, that'll do it.
 Christine has bondo-filled a lot of the large imperfections in body surface and is ready to start sanding. Look at that go-getter stance. I bet she'll be done by lunch with time to spare!
 Well, she'll probably be done by dinnertime at least.
 Ok. Maybe breakfast is a better goal. Delicious breakfast.
 While Christine gets hungry, our extra team member, Guy, does his usual badass thing... Ok, so he's not on our team, but TechShop is pretty awesome, isn't it?
 After a hearty breakfast, it's time to fill out the fender mold too.
 Then sand and coat it.
 Glass it.
 Let it cure overnight.
 Then, when it least expects it, rip its guts out.
 The mold release and latex primer make this a much easier job.
 Brand new fenders, comin' up!
 We cut holes in the body to fit the fender and see how they rest relative to the wheels. We'd naturally done a lot of test measuring before cutting.
 I'm just testing out the rock before we attach the fenders. It seems to be working.
 Get all the pieces lined up and squared off.
 BRING ON THE FIBER!
 Aww yeah.
 Andrew cuts out the mouth shape because we don't need that buck-toothed piece in the front for support anymore.
 But once the bus took on its final shape, it came to life.
 And devoured its first victim. Poor Luke.
 So we slayed the beast to save him.
 Then we went back to more sanding because paint is coming soon.
 To paint, we had to build our own spray room. Tech shop has a powder coating room, but it we didn't want to monopolize it and it wasn't big enough for us to comfortably spray in every direction anyway.
 Pro lighting.
 Some sort of voodoo is going on behind those curtains.
 And the bus comes out primed.
 Then we paint the whole body a base coat of black and mask off the windows.
 Followed by a metallic coat of blood red.
 Pulling back the masking reveals the windows.
 While that was happening, we dyed our front tires, because we were tired of them being gray.
 Christine works on our vinyl stencils. She's really meticulous. So is the computer that cut the shapes for her.
 With the stencils on transfer paper, they are ready to be put on the bus...
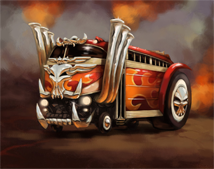
 ...which let us achieve this sick paint job (along with an automotive clear coat)
 After the paint dries, we pack it up for transport. We still have more work to do: the bus needs all its chrome parts and cosmetic engine attached. Chrome will be the next post. It will be soon, I promise.

 Hey now. What have we here?
 Ooooooh. This is nice...
 OH MAN!
 Something with wheels. A wagon works, but bonus points if your wheels are mixed sizes).
 Some kind of shell for the body. I recommend something less itchy than fiberglass.
 The body's gotta have flames. Otherwise, why even bother? You guys know how to color, right?
 While we were letting the primer dry on the mold for the body, we headed to a nearby park to put the Bus through its paces.
 The CNC mill we used to carve out the body is also great for some smaller more defined shapes (which we'll see more of later), but there's a lot of sanding involved. The Tour of Destruction just wouldn't be complete without its signature pipes, which need to be smooooooooth.
 Like the body, the exhaust pipes need numerous coats of primer over the foam before we can lay down the fiberglass. The polyester resin that we are going to use for the fiberglass body will erode the polystyrene foam, so we need a thick protective layer. Remember, when you are dealing with the pink, always protect your junk.. or you junk might melt off.
 We then put on our science suits and get ready to work with some noxious, nasty ass chemicals n'shit. Fiber glass is not for the feint of heart, and it requires a good amount of manly toughness to get it right. Of which we have plenty.
 First we cut out sheets of it to lay over the surface of the bus. The fiber glass is literally sheets of long threads or fibers of glass - it's itchy shit.
 We've got about 15 minutes before the resin hardens to the point that we can't work it into the fibers anymore, so we lay the glass on quickly.
 Dab, dab, dad-dabbity dab, scrub, scrub dab. We need to work the fabric a lot to mash out the bubbles and seams that occur.
 For our last fiber glass layer, we dye the resin red. We thought maybe this will help as a base coat. We were wrong; it's all getting sanded off anyway.
 Here we find Sean removing the body from the mold with the care and precision of a surgeon.
 Lots and lots of sanding - we've got to get this guy smooth. Like butter.
 The bus is finally starting to come together, but we can't relax yet! Now that we have the final shell for the body, we need to start adding some of the finer details to this rockin' bod.